Descriptions of the options for Interactive Tracker Configurations
Follow the steps to modify tracker configurations.
Step 1:
Log into the site by utilizing your username and password.
Step 1:
Log into the site by utilizing your username and password.
Step 2:
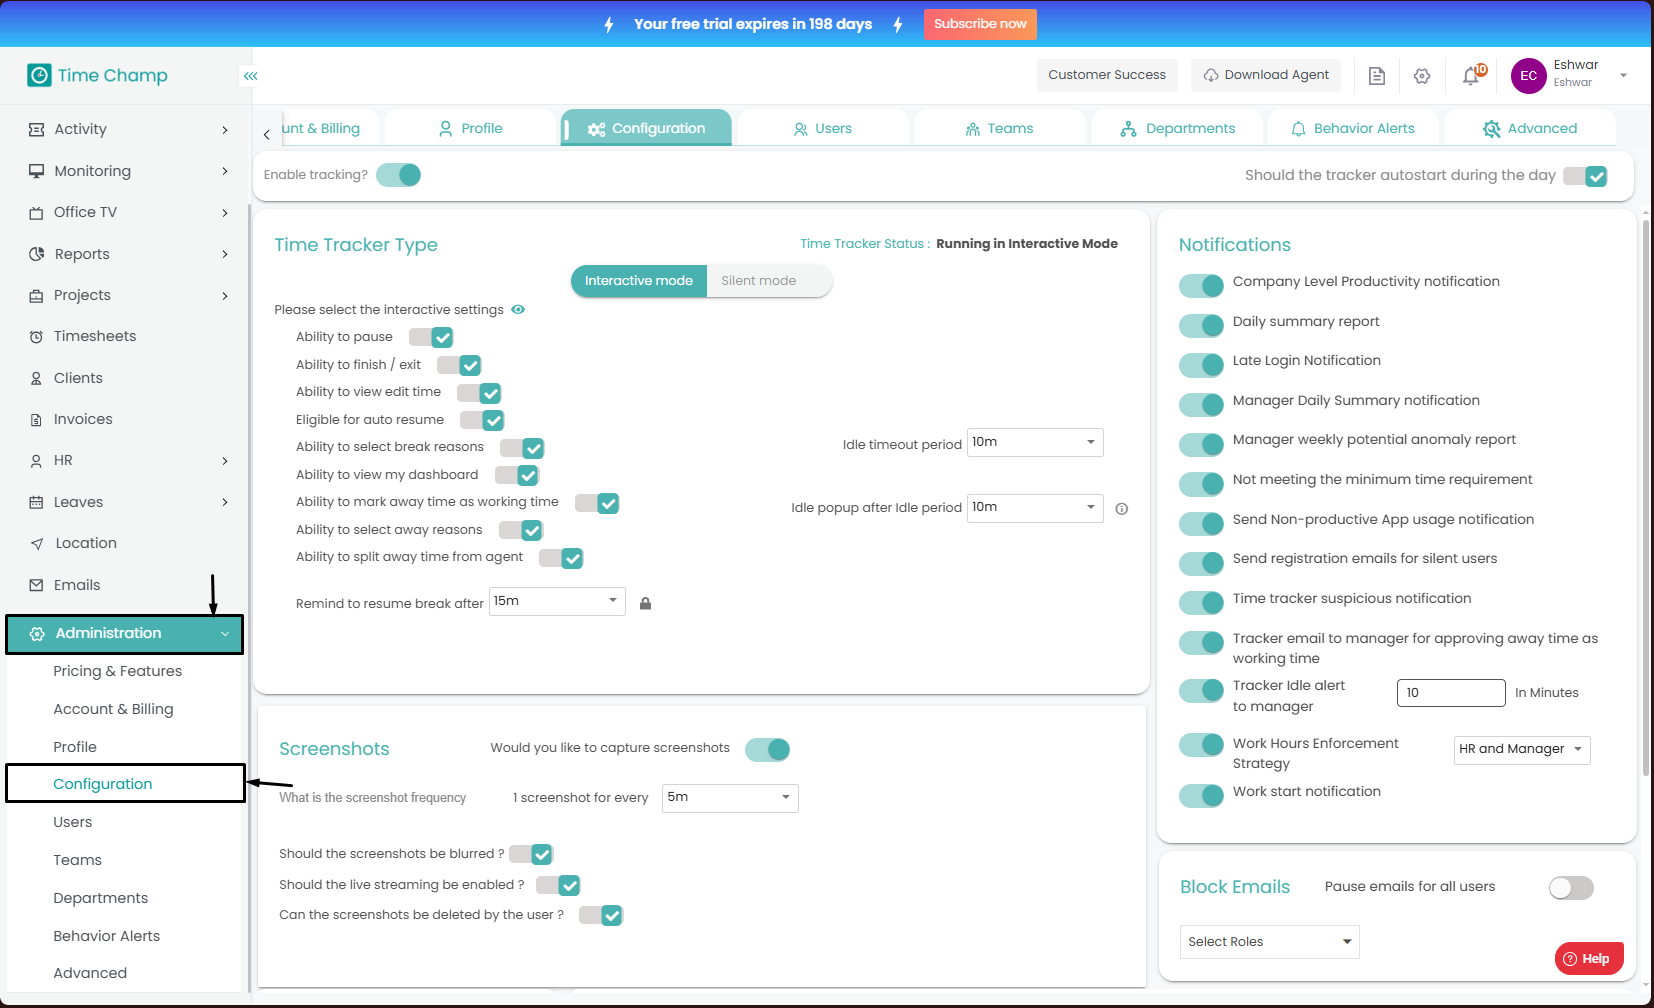
Navigate to the Administration Module and then to the Configuration Section
Navigate to the Administration Module and then to the Configuration Section
Step 3:
Now you can view the Tracker Configuration Options in the highlighted area in the below image.
Now you can view the Tracker Configuration Options in the highlighted area in the below image.
The following descriptions are for the options in the highlighted area in the above image:
- Ability to Pause
Employees will have the flexibility to pause the tracker whenever required with this option enabled.
Ability to Finish or Exit
Employees can choose to finish or exit the tracker whenever required.- Ability to View and Edit Time
Employees are provided with the option to “Go to Edit Time.” By selecting this option, they will be redirected to the Attendance section of their user dashboard. From there, they can review and edit their recorded time entries as per the organization’s policies and permissions. - Eligibility for Auto Resume
The tracker is equipped with an auto-resume feature, which automatically resumes tracking after a defined break period. - Ability to Select Break Reasons
While taking a break, employees can select an appropriate break reason from the available list. - Ability to View My Dashboard
Employees can access the “My Dashboard” option directly within the tracker interface. By clicking this option, they are navigated to their personal dashboard, where they can review their attendance. - Ability to Mark Away Time as Working Time
If the system detects inactivity for a predefined duration which can be set as per your organizational policy, a popup prompt will appear, allowing the employee to specify their current status either as working or away.
- Ability to Split Away Time
Employees can use the Split Away Time feature to modify their attendance records more precisely. This allows them to divide a time segment into multiple parts, marking each portion individually as either working or non-working in the attendance section.
 Note: The Interactive and Silent modes of the tracker can be switched freely. However, please note that this functionality is only available if the tracker was initially installed in Interactive Mode. If the tracker was installed in Silent Mode, switching to Interactive Mode will not allow the user to have an interactive tracker.
Ensure that all modifications are saved upon completion; unsaved changes will not take effect.
Related Articles
How to change the tracker from Interactive to Silent Mode?
Follow the steps to modify Tracker Configuration from Interactive to Silent Step 1: Log into the site utilizing your credentials. Step 2: Navigate to the Administration Module and then to the Configuration section. Step 3: Now you can view the ...Understanding the Dashboard and the Data Download Options within it.
Follow the steps to view and Understanding the Dashboard and the Data Download Options within it. Step 1: Log into the site utilizing your credentials. Step 2: Navigate to the Time Tracker Module and then to the Dashboard section. The Dashboard ...Installation of Time Champ V5 Interactive Version in Windows
Steps to Install Time Champ V5 Interactive Version in Windows. Step 1: Log in to your Time Champ account using your credentials. Step 2: To install the application, click on “Download Agent.” Step 3: Select the operating system of your computer. Step ...Installation of Time Champ V5 Interactive Version in Linux System
Steps to Install Time Champ V5 Interactive Version in Linux System. Step 1: Log in to your Time Champ account using your credentials. Step 2: To install the application, click on “Download Agent.” Step 3: Select the operating system of your computer. ...Installation of Time Champ V5 Interactive Version in Mac System
Steps to Install Time Champ V5 Interactive Version in MAC System. Step 1: Log in to your Time Champ account using your credentials. Step 2: To install the application, click on “Download Agent.” Step 3: Select the operating system of your computer. ...