How to Install Time Champ (Interactive Mode) on Mac OS
Note: To install Time Champ in the system the user must exclude time champ package from their antivirus
Step 1: Log In
- Use your credentials to log in.
- Click on "Navigate to Dashboard.

Step 2: Download the Agent
- Click on the "Download Agent" button.

Step 3: Select Your Operating System
- Choose the appropriate operating system for your device.

Step 4: Installation for Employees
- Select "Install for employees."

Step 5: Choose Installation Mode
- Choose the Interactive option.

Step 6: Manual or Automatic Installation
- Manual: If you already have credentials, choose this option.
- Automatic: If you’re new, the app will log you in using your desktop name.
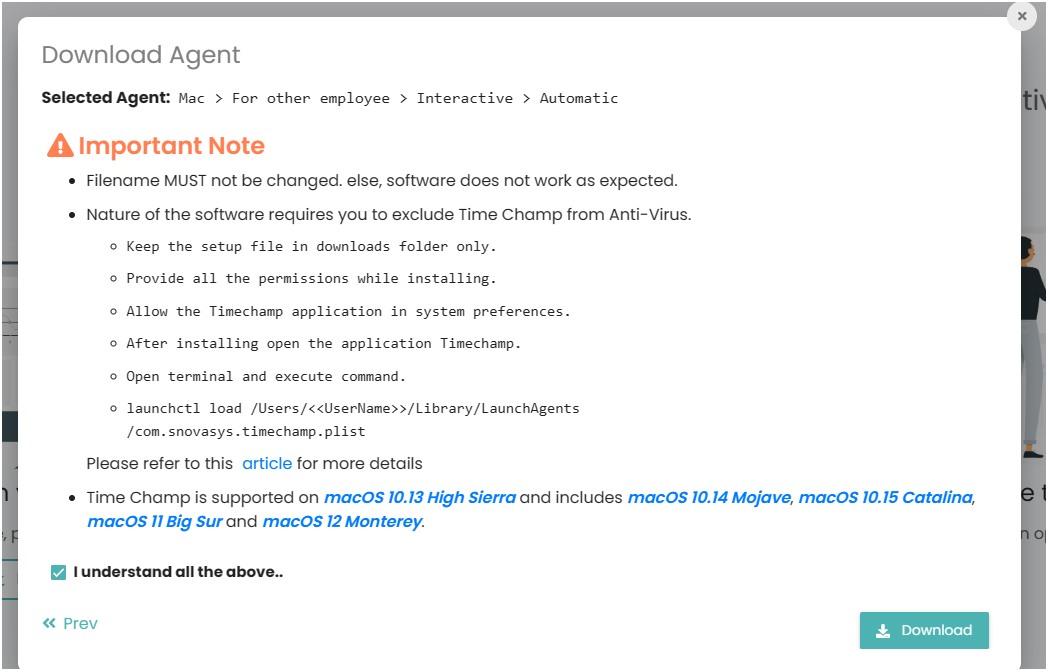
Note:
- Do not change the filename.
- The folder must remain in the "Downloads" directory.

Step 7: Install Time Champ
- Unzip the Time Champ folder.
- Double-click the `.pkg` file to begin installation.

If you get an error as shown in the below image.

1. Go to System Preferences > Security & Privacy.
2. In the General tab, click "Open Anyway" to proceed with the installation.

- Follow the on-screen instructions and click "Next" to install.

- After installation, two pop-up windows will appear. Click "Allow" on both.

Step 8: Grant Permissions to Time Champ
1. Open System Preferences and go to Security & Privacy.
2. In the Privacy tab, add the Time Champ app from the Applications folder to the following sections:
- Accessibility
- Input Monitoring
- Screen Recording

Optional Step: Add to Login Items
- Search for Login Items in the settings.
- Navigate to "Login Items" and add the Time Champ app.

Step 9: Run Time Champ
- Open the Applications folder and launch the Time Champ app. It will log you in automatically.

Step 10: Run a Command in Terminal
- Open Terminal and run the following command:
launchctl load ~/Library/LaunchAgents/com.snovasys.timechamp.plist

If you have any questions or require assistance please reach out to support@timechamp.io
Related Articles
Installation of Timechamp V4 Interactive Version in Mac
Step 1: Log in to your Timechamp account with credentials. Step 2: After logging in with the credentials, click on 'Navigate to Dashboard.' Step 3: To install the application, click on download agent. Step 4: Select the operating system of your ...Installation of Timechamp V4 Interactive Version in Linux
Step 1: Login into your Time Champ account Step 2: To install the application, click on download agent. Step 3: Select the operating system of your computer Linux. Step 4: If you would like to install the application on your admin account system, ...Uninstallation in Mac
Step 1: Open terminal and run this command to unload the time champ file launchctl unload ~/Library/LaunchAgents/com.snovasys.timechamp.plist Step-2: Go to applications select Time Champ or svcvtt application and move to bin Step-3: Click on Go and ...Interactive Tracker Configurations
Step 1: Navigate to Administration module. Step 2: Navigate to Configurations. Here you can select whether you want to enable tracking or not and we can also enable or disable the option to auto start the tracker every day or not. Interactive ...Time Claim
In Time Claim, we can see a detailed overview of any user who was applied for the Time claim. Time Claim means if the user was away from the system due to any meeting, at that time his system will be in a state of idle, so to make that time a working ...